The AntiEtch® Installation Process: What to Expect from Start to Finish
If you’re ready to protect your marble countertops with AntiEtch®, you might be wondering what the installation process involves.
Unlike traditional sealers, AntiEtch® is a specialized protective coating that requires expert application to ensure long-lasting protection against etching and stains.
In this guide, we’ll walk you through each step of the AntiEtch® installation process, so you know exactly what to expect when scheduling your service.
Step 1: Evaluation of Your Marble Countertops
Before we begin, a trained technician will evaluate your stone to determine the best approach for application. During this step, we:
- Assess the surface for etching, scratches, and existing damage.
- Inspect seams and joints to ensure they are properly filled before applying AntiEtch®.
- Discuss your finish preferences—matte, satin, or polished.
- Provide a detailed quote and answer any questions you may have.
Once your evaluation is complete, we’ll schedule your AntiEtch® installation appointment.
Step 2: Masking & Protecting Surrounding Areas
To ensure that your kitchen or bathroom remains clean and undamaged, we carefully mask off surrounding surfaces before beginning work. This step:
- Protects adjacent surfaces, including backsplashes and appliances.
- Prevents dust and debris from spreading throughout your space.
- Ensures a clean, controlled environment for proper AntiEtch® application.
Step 3: Surface Preparation
Proper preparation is critical to ensuring that AntiEtch® bonds correctly with your marble. Our team will:
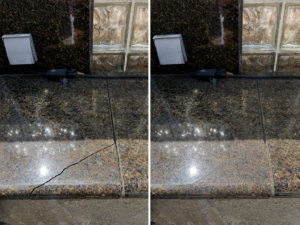
- Grind the surface to a low, even hone—this step removes all existing etching and scratches.
- Fill in gaps and seams to create a smooth, uniform surface.
- Thoroughly clean the marble to remove dust, oils, and residues.
This process ensures that the AntiEtch® coating adheres properly and provides long-lasting protection.
Step 4: Application of AntiEtch® Coating
With the surface fully prepped, our technician carefully applies AntiEtch® in thin, even layers. The coating is designed to:
- Maintain the natural look and texture of your stone.
- Provide seamless, complete coverage for full protection.
- Self-level to create a smooth, flawless finish.
Step 5: Curing with UV Light Technology
Once applied, AntiEtch® is cured using proprietary UV light technology. This process:
- Hardens the coating in just a few hours, allowing for same-day use.
- Ensures a strong, permanent bond with the marble.
- Eliminates drying time, so your countertops are immediately protected.
Step 6: Finishing & Customizing Your Countertop’s Look
After curing, we refine the surface to achieve your desired finish. We offer three finish options:
- Matte: A soft, natural look with no shine.
- Satin: A balanced finish with a slight sheen.
- Polished: A high-gloss, reflective surface.
Our technician sands and details the surface to create a smooth, even finish that matches your preference.
Step 7: Final Detailing & Cleanup
Before wrapping up the installation, we perform final detailing to ensure everything looks perfect. This includes:
- Inspecting the surface for flawless coverage and consistency.
- Cleaning the surrounding areas to remove any dust or residue.
- Providing you with care instructions to keep your countertops in pristine condition.
At this point, your countertops are fully protected and ready for use.
Step 8: Reinstalling Faucets & Fixtures
If your installation included a bathroom or kitchen sink, you’ll need to have your faucet reinstalled by a licensed plumber after the process is complete.
Find a Certified AntiEtch® Applicator
If you’re ready to protect your marble countertops with AntiEtch®, our expert team at Sureshine Care and Restoration Services is here to help.
Not in our service area? Find a certified AntiEtch® applicator through the Sureshine Service Network.
Frequently Asked Questions
How long does the AntiEtch® installation take?
A: The process typically takes one full day, depending on the size and condition of your countertops.
Do I need to prepare anything before the installation?
A: Your faucets and hardware will have to be removed from the countertop. We also recommend clearing your countertops of appliances, decorations, and personal items before our team arrives.
Is AntiEtch® safe for food preparation?
A: Yes! AntiEtch® is non-toxic and completely safe for food-contact surfaces.
Can I choose the finish of my countertop?
A: Yes! We offer matte, satin, and polished finishes, allowing you to customize the final look of your stone.
How soon can I use my countertops after the installation?
A: Your countertops will be fully cured the same day, but any removed plumbing fixtures will need to be reinstalled before use.
Schedule Your AntiEtch® Installation Today
With AntiEtch®, you can protect your marble countertops from stains and etching while keeping them beautiful for years. If you’re ready for a worry-free kitchen, schedule your installation today.